更新日:

準備
今回作成するReact アプリケーションは、`create-react-app`を利用して作ります。
npxコマンドを利用することで簡単に始めることができます。
$ npx create-react-app drupal-editor
$ cd drupal-editor
$ yarn add axios
Drupal8・サーバー側の対応
ブラウザ上からREST APIにアクセスする場合、Drupal・サーバー側でのCORS対応が必要となります。まずはDrupalのservicesにて必要なメソッド・オリジンなどをallowしましょう。以下のコードはほぼ全てを許可する設定です。開発・テスト環境以外で利用することは非常に危険ですのでご注意ください。
   # Configure Cross-Site HTTP requests (CORS).
   # Read https://developer.mozilla.org/en-US/docs/Web/HTTP/Access_control_CORS
   # for more information about the topic in general.
   # Note: By default the configuration is disabled.
  cors.config:
    enabled: true
    # Specify allowed headers, like 'x-allowed-header'.
    allowedHeaders: ['content-type', 'authorization', 'x-csrf-token', 'access-control-allow-origin', 'access-control-allow-creedntials', 'content-disposition']
    # Specify allowed request methods, specify ['*'] to allow all possible ones.
    allowedMethods: ['*']
    # Configure requests allowed from specific origins.
    allowedOrigins: ['*']
    # Sets the Access-Control-Expose-Headers header.
    exposedHeaders: false
    # Sets the Access-Control-Max-Age header.
    maxAge: false
    # Sets the Access-Control-Allow-Credentials header.
    supportsCredentials: true
また、ブラウザ上かつ別ドメインからGET以外のリクエストを行う場合、ApacheやNginxでOPTIONリクエストによるpreflightを受け付ける必要があります。この際、以下の点に注意してください。
- 別ドメインからのリクエストでは、`Content-Type: application/json`・`Content-Type: application/hal+json`ではなく`Content-Type: text/plain`にて送られてくる (参考:https://developer.mozilla.org/ja/docs/Web/HTTP/CORS#Simple_requests)
- preflightも含めてレスポンスヘッダに`Access-Control-Allow-Origin`を含める必要がある
この2点の対応が漏れていると、406 ErrorまたはCORSエラーを大量に受け取ることになります。特に2のpreflightについては、現時点でDrupal側でOPTION / に対するレスポンスヘッダを設定することができません。そのためサーバー側で対応する必要がありますので要注意です。
ブラウザからPOSTするサンプルコード
実際にPOSTが行えるかどうかの確認は、以下のようなコードを実行することで可能です。
import axios from 'axios';
class Client {
  constructor (endpoint, username, password) {
    this.endpoint = endpoint
    this.username = username
    this.password = password
  }
  getAuth() {
    return {
      username: this.username,
      password: this.password
    }
  }
  async post (body) {
    const { data } = await axios.get(`${this.endpoint}/rest/session/token`)
    const param = {
      method: 'POST',
      url: `${this.endpoint}/node?_format=hal_json`,
      data: body,
      headers: {
         'Content-Type': 'application/hal+json',
         'X-CSRF-Token': data,
         'Access-Control-Allow-Origin':'*',
         'Access-Control-Allow-Credentials': 'true'
      },
      auth: this.getAuth()
    }
    try {
      const response = await axios(param)
      return {
        message: response.statusText,
        link: response.data['_links'].self.href
      }
    } catch (e) {
      const { response } = e
      const message = response && Object.keys(response).length > 0 ? `[${response.status}] ${response.data.message}` : 'Internal Server Error'
      return {
        message: message,
        link: ''
      }
    }
  }
}

const client = new Client('https://drupal.example.com', 'username', 'password')
client.post({
    _links: {
      type: {
        href: 'https://drupal.example.com/rest/type/node/article'
      }
    },
    type: {
      target_id: 'article'
    },
    title: {
      value: title
    },
    body: [{
      format: 'basic_html',
      value: 'Hello World'
    }]
  }).then(result => console.log(result))
Clientクラスの初期化時にDrupal APIのエンドポイントとBasic認証のユーザー名・パスワードを指定します。Drupal APIの認証方式にBasic認証を設定し、ユーザー名・パスワードはDrupalへのログイン情報を入力してください。 その後、postメソッドに投稿したいコンテンツタイプやコンテンツ情報を渡してやることでDrupal APIへのPOSTリクエストを実行します。
HTTP4xx系のエラーが返って来る場合は、DrupalのREST API設定かリクエスト内容を確認しましょう。5xx系の場合はリクエスト内容をDrupalが処理できていませんので、postに渡している内容やDrupalのエラーログを確認しましょう。
Reactから投稿する
ここまででブラウザからDrupalに投稿する処理の実装が終わりました。あとはReactでエディタを表示させて、その内容をPOSTしてやるだけです。
もっともシンプルなサンプルは以下のような形です。
import React from 'react';
import axios from 'axios';

const endpoint = 'https://drupal.example.com';
const username =  'username';
const password = 'password';

const createPostQuery = (endpoint, post) => {
  const { title, content, editor } = post
  if (!title || !content) return new Error('Error: title and content is required')
  const node = {
    _links: {
      type: {
        href: endpoint + '/rest/type/node/article'
      }
    },
    type: {
      target_id: 'article'
    },
    title: {
      value: title
    },
    body: [{
      format: 'basic_html',
      value: editor
    }],
    field_example: {
      value: content
    }
  };
  return node
}

class Client {
  constructor (endpoint, username, password) {
    this.endpoint = endpoint
    this.username = username
    this.password = password
  }
  getAuth() {
    return {
      username: this.username,
      password: this.password
    }
  }
  async post (body) {
    const { data } = await axios.get(`${this.endpoint}/rest/session/token`)
    const param = {
      method: 'POST',
      url: `${this.endpoint}/node?_format=hal_json`,
      data: body,
      headers: {
        'Content-Type': 'application/hal+json',
        'X-CSRF-Token': data,
        'Access-Control-Allow-Origin':'*',
        'Access-Control-Allow-Credentials': 'true'
      },
      auth: this.getAuth()
    }
    try {
      const response = await axios(param)
      return {
        message: response.statusText,
        link: response.data['_links'].self.href
      }
    } catch (e) {
      const { response } = e
      const message = response && Object.keys(response).length > 0 ? `[${response.status}] ${response.data.message}` : 'Internal Server Error'
      return {
        message: message,
        link: ''
      }
    }
  }
}

const Result = ({result, createdLink}) => {
  if (!result) return null;
  return (
    <p>
      {result}
      {createdLink ? (<a href={createdLink} target="_blank" rel="noopener noreferrer">{createdLink}</a>): null}
    </p>
  )
}

class ReactEditor extends React.Component {
  state = {
    title: '',
    content: '',
    result: '',
    createdLink: ''
  }
  handleChange = ({target}) => {
    this.setState({
      [target.name]: target.value
    })
  }
  handleSubmit = async (e) => {
    e.preventDefault()
    const param = createPostQuery(endpoint, this.state)
    if (param instanceof Error) {
      this.setState({
        result: param.message
      })
      return
    }
    this.setState({
      result: ''
    })
    const client = new Client(endpoint, username, password)
    const { message, link } = await client.post(param)
    this.setState({
      result: message,
      createdLink: link
    })
  }
  render () {
    const { title, content } = this.state
    return (
      <div>
        <h1>Editor</h1>
        <Result {...this.state} />
        <form onSubmit={this.handleSubmit} className="form">
          <table>
            <tbody>
              <tr>
                <th><label htmlFor='title'>Title</label></th>
                <td>
                  <input
                    onChange={this.handleChange}
                    type="text"
                    id="title"
                    name="title"
                    value={title}
                  />
                </td>
              </tr>
              <tr>
                <th><label htmlFor='content'>Content</label></th>
                <td>
                    <textarea
                      onChange={this.handleChange}
                      id="content"
                      name="content"
                      value={content}
                    />
                </td>
              </tr>
            </tbody>
          </table>
          <button type="submit">Post</button>
        </form>
      </div>
    )
  }
}

export default ReactEditor
`ReactEditor`クラス内にて、タイトル・本文を入力するフィールドと投稿処理を記述しています。`handleSubmit`メソッドでは先ほどのサンプルにあったREST APIを呼び出す処理が使用されています。また、投稿されたコンテンツを確認できるように`Result`コンポーネントを用意してREST APIのURLまたはエラーメッセージを表示させるようにしています。
最後に
このようにDrupal8のREST APIを利用することで、Drupalの外からコンテンツを入稿する仕組みが用意することができます。これによってTinymceやWordPressで導入されたGutenbergのように、Drupalがもつエディタ以外で入稿画面を作ることも可能です。
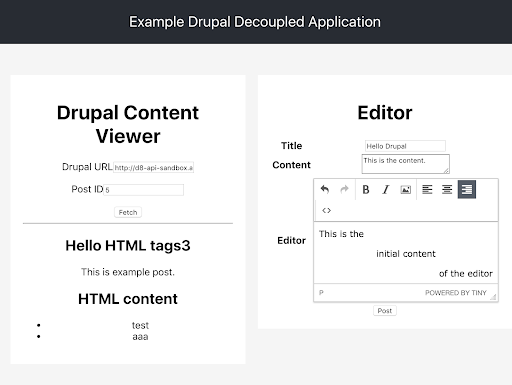
図: TinyMCEエディタを利用したサンプル
また、Node.jsからの入稿サンプルと組み合わせることで、さまざまなデバイス・場面からデータを入稿できるCMSというよりもはやAPIエンドポイント付きデータベースのような使い方も不可能ではありません。
みなさんもぜひ、Drupal REST APIを活用したサイト運営にトライしてみてください。


この記事を書いた人: Yoshikazu Aoyama
昔は回線交換やL2/L3のプロトコルスタックの開発をしてました。その後、組み込みLinuxやJava/Ruby on RailsなどのWebシステム開発などを経て現職。
インフラからDrupalのモジュール開発、Drupal以外の開発までなんでもやります。
普段は札幌で猫と一緒にリモートワークしています。 好きなモジュールは Restful Web Services と Rules。
関連コンテンツ
- Drupal 導入前に必ず考えたい「保守」のこと
- 手軽に本格的な Drupal のローカル開発環境を構築してみよう
- 9 つのシンプルなステップで Drupal 9 のテーマを作成してみよう
- Drupal 9: 一般的なエクスプロイトの経路をブロックする方法
- エンジニア新人研修のご紹介
- Headless CMS というトレンドに Drupal は適応している!?
- Drupal 9.1 が登場!アップグレードの準備はできていますか?
- Drupal 9 におすすめのモジュール
- State of Drupalプレゼンテーション(2021年4月)
- 第 16 回 Drupal をもっと知りたい方に向けた各種情報
Drupal 初心者講座バックナンバー
-
 Drupal 9/10 初心者講座
-
第 1 回 歴史に見る Drupal の DNA
-
第 2 回 Drupal はフレームワークか?CMS か?他の CMS との比較
-
第 3 回 Drupal の特徴
-
第 4 回 Drupal 9 / 10 のインストール (1)
-
第 5 回 Drupal 9 / 10 のインストール (2)
-
第 6 回 Drupal にコンテンツを投稿してみる
-
第 7 回 Drupal のボキャブラリとタクソノミーの使い方
-
第 8 回 コンテンツ管理における Drupal と他の CMS との比較
-
第 9 回 Drupal のブロックシステム
-
第 10 回 Drupal の標準クエリビルダー Views の使い方
-
第 11 回 Drupal と他の CMS のクエリビルダー機能を比較
-
第 12 回 Drupal の多言語機能と他の CMS やサービスとの比較
-
第 13 回 Drupal の権限設定と WordPress や Movable Type との比較
-
第 14 回 Drupal のテーマシステムについて
-
第 15 回 Drupal の拡張モジュールの選定と使い方
-
第 16 回 Drupal をもっと知りたい方に向けた各種情報